
Regripping golf clubs is one of those maintenance tasks that looks deceptively simple on paper. The kit arrives, the components seem self-explanatory, and the process appears manageable. Yet a surprising number of players run into avoidable problems, not because the task is difficult but because standard instructions leave out details that genuinely matter.
Knowing what a typical kit includes and what the packaging quietly glosses over makes the difference between a clean installation and a frustrating afternoon in the garage.
What Comes in a Standard Kit
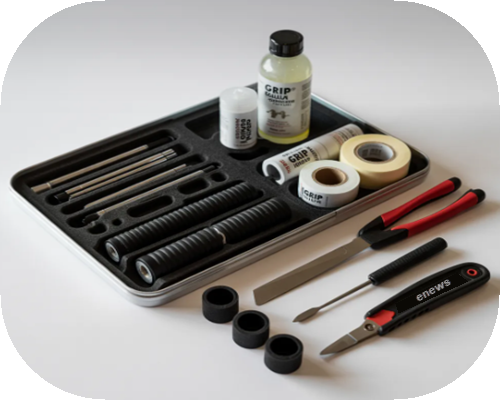
Each component in a regripping kit has a specific role, and treating any of them as interchangeable can lead to problems later. Players who want a straightforward starting point often turn to golf grip kits that bring grips, tape, solvent, and removal tools together in one package, rather than hunting down each item separately. Having everything on hand before starting also prevents those mid-job interruptions that throw off the whole process.
The Grips Themselves
Grips are the obvious centerpiece. They come in a range of sizes, surface textures, and materials, with rubber and synthetic compounds being the most widely used. Standard kits typically default to men’s sizing. Cord grips, which have a noticeably rougher feel, are a practical choice for players who deal with sweaty hands or play frequently in humid conditions.
Grip Tape
Double-sided tape is what actually holds the grip to the shaft after the solvent has dried. Most kits supply either pre-cut strips or a roll sized for standard shafts. One detail worth paying attention to is tape thickness. It has a direct effect on the finished grip diameter, which in turn influences how much pressure a player needs to apply and how the club feels through the swing.


Solvent
Solvent temporarily deactivates the tape’s adhesive, giving enough time to slide the grip on and adjust its position before everything locks in place. Mineral spirits-based formulas are standard. Some newer kits use water-activated tape that skips solvent entirely. Both work reliably, though a traditional solvent gives a slightly longer window to make adjustments before the bond sets.
A Hook Blade or Utility Knife
Getting old grips off cleanly is a step that often gets underestimated. Most complete kits include a hook blade for this purpose. The curved design allows the blade to cut through rubber without dragging directly across the shaft, which is critical for graphite.
What the Instructions Leave Out
The instruction sheet that comes with most kits covers the basic steps. What it rarely addresses are the variables that quietly determine whether the job goes smoothly or not.
Shaft Compatibility Warnings
Steel and graphite shafts are not treated the same way, and most instructions never say so. Graphite is far more susceptible to surface damage. A blade applied with too much force, or at the wrong angle, can permanently score the material. Before picking up any cutting tool, confirming the shaft material is a step that should not be skipped.
Tape Layering for Grip Size
Layering extra tape beneath a grip is a practical way to build up diameter without ordering specialty sizing. One additional wrap adds roughly one sixty-fourth of an inch. Two wraps get close to what a midsize grip feels like. This technique is common among players who need a slightly larger fit, yet most instruction sheets never bring it up.


Solvent Volume Matters
How much solvent gets applied has a real impact on the result. Too little, and the grip sticks before it reaches the right position. If you use too much, the excess collects inside the grip, which adds hours to the drying time. A better approach is to pour solvent directly into the grip, cover the open end with a finger, and rotate it to coat the inside evenly before installation.
Drying Time Before Play
Most kits suggest waiting a few hours after installation. A safer window is eight to twelve hours, particularly before heading out for a full round. Playing too early risks the grip twisting under swing pressure. Cold temperatures slow the bonding process further, so weather conditions are worth factoring in as well.
Alignment Marks and Logos
Many grips carry a logo or seam line on the underside, intended to help with consistent positioning. Instructions rarely explain how to use these reference points across an entire set. Matching the orientation of each grip gives the clubs a uniform look and provides a reliable visual reference at address.
Conclusion
A regripping kit genuinely covers the basics, but the instruction sheet that comes with it rarely provides complete information. Shaft compatibility, tape layering, solvent technique, and drying time all shape how the finished grip performs under real playing conditions. The mechanical side of the job is straightforward enough.
The surrounding details, though, take a bit more awareness to get right. Spending a few minutes on those gaps before starting leads to a cleaner result and removes most of the guesswork from the process.