


Anchor screws may seem easy with the right tool, but getting them tight while not damaging your wall requires some finesse. This guide provides a simple step-by-step guide for all professionals installing anchor screws. These tips will help you do it successfully, whether you are hanging a picture frame or a shelf on the wall.
Understanding Anchor Screws
Anchor screws are essential when you need to screw something into a wall without support beams. They spread behind the wall for added hold. There are types made from a few plastic types (most common), metal types (more durable), or toggle bolt types (in which the plastic type carries only the dynamic load). Both are best from a particular perspective, and it is essential to select the most suitable one to ensure stability.
Wholesale anchor screws are commonly used in construction projects to achieve strong, long-lasting fixation in concrete and masonry. Having the right tools for proper installation. You will need a power drill, a screwdriver, a level, and a measuring tape. These tools will also help prevent errors that could damage the walls.
Preparation Is Key
Concrete walls require special drill bits, for example. Knowing the wall material will help you determine which anchors and tools it needs. However, you must first identify the type of wall you are working with, whether it’s drywall, plaster, or concrete. Each requires a different approach.
Marking the Spot
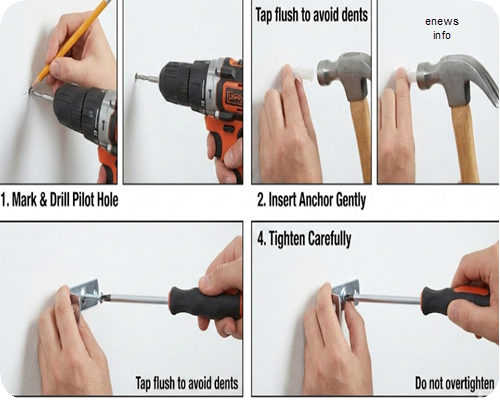
First, you have to decide where to insert the anchor screws. Put a mark at the location using a pencil. Using a level will help ensure that the placement is both straight and aligned. At this stage, accuracy prevents crooked installs and damage.


Drilling with Caution
Drill a carefully marked hole once that spot has been located. Drill bit: The drill bit should be the same size as the anchor. Drill too large a hole and the wall weakens; drill it too small and the anchor won’t fit. When using this method, you must drill slowly and carefully while applying steady pressure so that nothing breaks through the surface.
Inserting the Anchor
Gently tap the anchor into the hole after drilling. It should fit snugly. If it is resistant, do not push it. Instead, adjust the whole size if needed. A satisfactory fit means that the screw goes correctly into the anchor so it will hold.
Securing the Screw
Once the anchor is installed correctly, you can begin inserting the screw. Use a screwdriver and turn it slowly to ensure it goes in securely. Avoid over-tightening—this can cause the screw to lose grip or even damage the wall. Tighten just enough so the screw feels firmly in place, without forcing it beyond resistance.
Testing the Installation
To test the installation, pull lightly on the object where the screw is attached to the sleeve. It should feel secure. If you notice any movement, please check the location of the anchor and screw. Either follow through and correct the problems, or you risk a falling product later.
Handling Mistakes
Even with due planning, mistakes can happen. It may sound bad to damage the wall or lose the anchor; however, stay cool. Pull out the anchor and fill up the hole with a proper wall filler. Let the area dry before trying a new setup.


Maintenance Tips
Screws can become loose over time—particularly when used to mount heavier objects. Sometimes this can lead to accidents, and keeping them tight on the wheel helps prevent this. Consider the weight span of specific anchors for long-term stability as well.
Environmental Considerations
With sustainability, you might use recycled materials or eco-friendly anchors. Some manufacturers make eco-friendly products that are functional and reassuring, but not all do.
Conclusion
Wall screws anchored without hurting the walls? Anyone can have a secure installation if they learn about the tools and techniques. Hang objects with care—but make sure that you do not damage walls. These steps will help you through a successful project, be it a small picture frame or a large shelf.